
| 일 | 월 | 화 | 수 | 목 | 금 | 토 |
|---|---|---|---|---|---|---|
| 1 | ||||||
| 2 | 3 | 4 | 5 | 6 | 7 | 8 |
| 9 | 10 | 11 | 12 | 13 | 14 | 15 |
| 16 | 17 | 18 | 19 | 20 | 21 | 22 |
| 23 | 24 | 25 | 26 | 27 | 28 |
- sofrware architeture
- ui 디자인 기본원칙
- 매크로를 바라보는 시각
- fan-in fan-out
- 상태다이어그램
- bandit21
- base64
- 생성패턴 행위패턴 구조패턴
- 디자인패턴
- usecase description
- prototypepattern 예시 example
- 모듈구조도
- cron
- status diagram
- 팬인과 팬아웃
- factory metohd pattern
- gof design pattern
- Bandit
- nc reverse shell
- 클래스 관계
- ssh
- 소프트웨어공학 디자인패턴
- 리버스쉘
- UseCase
- strucuture charat
- madia designer ui design
- 암표거래
- telnet
- 객체 상속 속성 인스턴스 메소드 오퍼레이션
- 구조적 설계
- Today
- Total
2.log
10 | 디자인 패턴 (생성패턴) 본문
생성 패턴
객체 생성과 관련, 객체의 인스턴스화 과정을 추상화하는 방법 다룸, 캡슐화를 통해 정보 은닉하여 재사용과 유연성 높임
Factory Method Pattern (Virtual Constructor)
객체 생성을 위한 인터페이스는 정의하지만, 어떤 클래스의 인스턴스를 생성할지에 대한 결정은 서브클래스에 위임함으로써 객체 생성로직을 캡슐화하는 패턴으로, 생성할 객체 타입이 예측불가할 때 사용가능

+ OCP(Open-Closed-Principle) 적용
+ 기존 클라이언트 코드 수정 없이 새로운 인스턴스를 다른 방법으로 생성 가능 (유연성, 확장성)
+ 변화가 일어날 수 있는 객체 생성을 담당하는 클래스(Factory)를 만들어 한 곳에서 관리 (유지보수 용이)
+ 객체 생성로직을 캡슐화하고, 구체 클래스(ConcreteCreator)를 숨겨 캡슐화와 은닉 구현(낮은 결합)
- 새로운 객체 생성 할때마다 그에 따른 서브클래스 추가해야 하므로 관리할 클래스가 선형적으로 증가함
구현
- 상속을 통해 서브클래스에서 Factory 메소드를 오버라이딩하여 객체 생성부 구현
- Product : Factory 메소드가 생성하는 객체의 인터페이스 정의
- ConcreteProduct : Product 클래스에 정의된 인터페이스를 실제로 구현
- Creator : Product 타입의 객체를 반환하는 Factory 메소드 선언
- ConcreteCreator : Product 를 실제 생산하는 클래스, Factory 메소드 재정의하여 ConcreteProduct의 인스턴스 반환함
// Product Interface
public interface Product {
	void doSomething();
}

// Product Interface 구현한 구체 클래스1
public class ConcreteProduct1 implements Product {
	pubic void doSomething() {
    	System.out.println("ConcreteProuct1의 doSomething 메소드")
    }
}

// Product Interface 구현한 구체 클래스2
public class ConcreteProduct2 implements Product {
	pubic void doSomething() {
    	System.out.println("ConcreteProuct2의 doSomething 메소드")
    }
}

// Creator 추상 클래스
public abstract class Creator {
	public abstract Product factoryMethod();

    public void someOperation() {
    	Product product = factoryMethod();
        product.doSomething();
    }
}

// Creator 추상 클래스를 구현한 구체클래스1
public class ConcreteCreator1 extends Creator {
	public Product factoryMethod() {
    	return new ConcreteProduct1();
    }
}

// Creator 추상 클래스를 구현한 구체클래스2
public class ConcreteCreator2 extends Creator {
	public Product factoryMethod() {
    	return new ConcreteProduct2();
    }
}


// 클라이언트 클래스
public class Client {
	public static void main(String[] args) {
    	Creator creator1 = new ConcreteCreator1();
        creator1.someOperation();    // ConcreteProduct1의 doSomething method 출력

        Creator creator2 = new ConcreteCreator2();
        creator2.someOperation();    // ConcreteProduct2의 doSomething method 출력
    }
}
Creator는 추상 클래스로 팩토리 메소드를 정의하고 있으며, 이 클래스를 상속받은 ConcreteCreator1 & 2는 각각 ConcreteProduct1 & 2를 구현하게 됨. 이렇게 하면 구체클래스와 Creator 클래스를 분리하고 객체 성성 로직을 Creator 클래스 내부에 캡슐화 함으로써 클래스 간 결합을 낮추며, 어떤 제품에 대한 변화가 있을 시 해당 제품을 생성하는 팩토리 메소드만 수정하면 되므로 유연성 높아짐
위 절차에 맞게 자동차 만드는 것을 팩토리 메소드로 구현하면 아래와 같음
public interface Car {
    void start();
    void stop();
}

public class SedanCar implements Car {
    public void start() {
        System.out.println("SedanCar의 시동을 켭니다.");
    }

    public void stop() {
        System.out.println("SedanCar의 시동을 끕니다.");
    }
}

public class SUVCar implements Car {
    public void start() {
        System.out.println("SUVCar의 시동을 켭니다.");
    }

    public void stop() {
        System.out.println("SUVCar의 시동을 끕니다.");
    }
}

public class ElectricCar implements Car {
    public void start() {
        System.out.println("ElectricCar의 시동을 켭니다.");
    }

    public void stop() {
        System.out.println("ElectricCar의 시동을 끕니다.");
    }
}

public abstract class CarFactory {
    public abstract Car createCar(String type);
}

public class SedanCarFactory extends CarFactory {
    public Car createCar(String type) {
        if (type.equals("sedan")) {
            return new SedanCar();
        } else {
            throw new IllegalArgumentException("유효하지 않은 자동차 유형입니다.");
        }
    }
}

public class SUVCarFactory extends CarFactory {
    public Car createCar(String type) {
        if (type.equals("suv")) {
            return new SUVCar();
        } else {
            throw new IllegalArgumentException("유효하지 않은 자동차 유형입니다.");
        }
    }
}

public class ElectricCarFactory extends CarFactory {
    public Car createCar(String type) {
        if (type.equals("electric")) {
            return new ElectricCar();
        } else {
            throw new IllegalArgumentException("유효하지 않은 자동차 유형입니다.");
        }
    }
}

public class Client {
    public static void main(String[] args) {
        CarFactory factory = new SedanCarFactory();
        Car sedan = factory.createCar("sedan");
        sedan.start();  //"SedanCar의 시동을 켭니다."
        sedan.stop();   //"SedanCar의 시동을 끕니다."

        factory = new SUVCarFactory();
        Car suv = factory.createCar("suv");
        suv.start();  //"SUVCar의 시동을 켭니다."
        suv.stop();   //"SUVCar의 시동을 끕니다."

        factory = new ElectricCarFactory();
        Car electric = factory.createCar("electric");
        electric.start();  //"ElectricCar의 시동을 켭니다."
        electric.stop();   //"ElectricCar의 시동을 끕니다."
    }
}
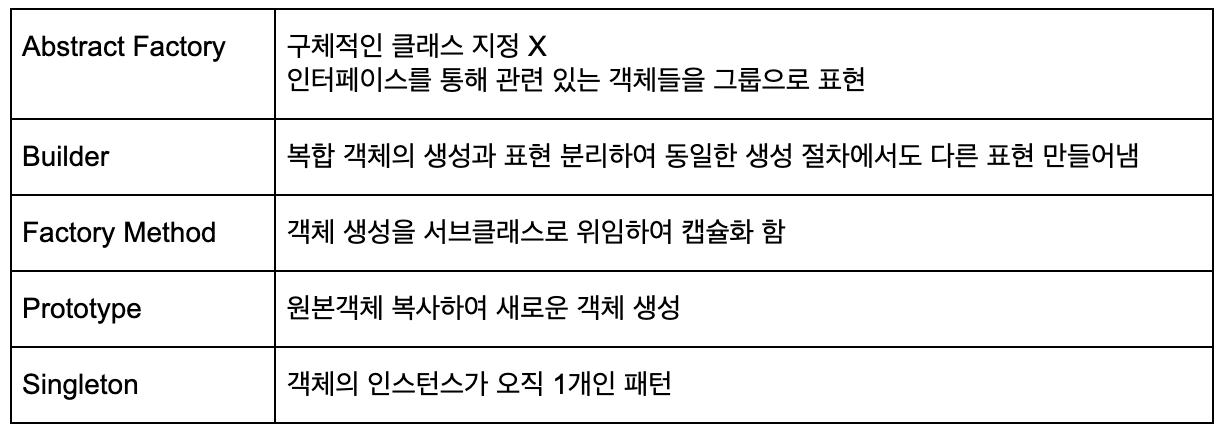
Abstract Factory Pattern
구체적인 클래스에 의존하지 않고 서로 연관된 객체들의 조합을 만드는 인터페이스 제공하는 패턴
관련성 있는 여러 종류의 객체를 일관된 방식으로 생성하는 경우 유용하며 일반적으로 팩토리 메소드 패턴과 함께 사용됨
(팩토리 메소드 패턴을 확장한 개념으로, 팩토리 메소드를 여러개 만들고 grouping하여 하나로 관리할 수 있도록 함)
>> 팩토리 메소드 패턴은 하나의 객체를 생성하는 패턴 / 추상 팩토리 패턴은 관련된 객체들의 집합을 생성하는 패턴
+ 객체 생성코드와 사용코드를 분리함으로써 유연성과 확장성 높임
+ 여러 종류의 객체 생성하는 로직이 한 곳에서 관리되므로 객체 생성 로직의 중복을 방지, 유지보수 용이
+ 제품군 교체 용이
- 각 구현체마다 팩토리 객체들을 모두 구현해 주어야 하기에 코드 복잡성 증가
- 생성되는 제품은 추상 팩토리가 생성할 수 있는 제품 집합에 고정되어 있기에 새로운 제품군 추가가 어려움 (추가 시 팩토리의 구현 변경이 요구됨 -> 이는 추상 팩토리와 모든 서브클래스의 변경으로 이어짐)
구현
- 객체 집합을 생성하기 위한 정의를 추상체에 위치시키고, 하위 구현체에서 세부 집합 생성 과정을 구현
- AbstractFactory : 실제 팩토리 클래스의 공통 인터페이스
- ConcreteFactory : AbstractFactory 클래스의 추상 메소드를 상속받아 구체적인 객체 생성하는 클래스
- AbstractProduct : 객체들의 공통 인터페이스 정의
- ConcreteProduct : AbstractFactory를 상속받아 구체적인 객체 구현
- Client : AbstractFactory와 AbstractProduct 를 사용해 객체 생성
// 객체들의 공통 인터페이스 정의
public interface AbstractProduct {
    void doSomething();
}

// 객체들의 일반적인 추상 팩토리 인터페이스 정의
public interface AbstractFactory {
    AbstractProduct createProduct();
}

// 구체적인 객체들과 해당 객체들을 생성하는 구체적인 팩토리 클래스들
public class ConcreteProductX implements AbstractProduct {
    @Override
    public void doSomething() {
        System.out.println("ConcreteProductX is doing something.");
    }
}

public class ConcreteProductY implements AbstractProduct {
    @Override
    public void doSomething() {
        System.out.println("ConcreteProductY is doing something.");
    }
}

public class ConcreteFactoryX implements AbstractFactory {
    @Override
    public AbstractProduct createProduct() {
        return new ConcreteProductX();
    }
}

public class ConcreteFactoryY implements AbstractFactory {
    @Override
    public AbstractProduct createProduct() {
        return new ConcreteProductY();
    }
}

// 클라이언트 클래스
public class Client {
    private AbstractFactory factory;

    public Client(AbstractFactory factory) {
        this.factory = factory;
    }

    public void createProductAndDoSomething() {
        AbstractProduct product = factory.createProduct();
        product.doSomething();
    }
}


// 메인 클래스에서 추상 팩토리 패턴을 사용
public class Main {
    public static void main(String[] args) {
        AbstractFactory factoryX = new ConcreteFactoryX();
        Client client1 = new Client(factoryX);
        client1.createProductAndDoSomething();

        AbstractFactory factoryY = new ConcreteFactoryY();
        Client client2 = new Client(factoryY);
        client2.createProductAndDoSomething();
    }
}
이를 자동차 조립공정에 적용하면 아래와 같음
// 객체 공통 인터페이스 정의
public interface CarPart {
    void assemble();
}

// 추상팩토리 인터페이스 정의
public interface CarFactory {
    Engine createEngine();
    Tire createTire();
}

// 각 부품에 대한 구체클래스 구현
public class Engine implements CarPart {
    @Override
    public void assemble() {
    	System.out.println("Assembling the engine")
    }
}

public class Tire implements CarPart {
    @Override
    public void assemble() {
    	System.out.println("Assembling the Tire")
    }
}

//구체적인 팩토리 클래스 구현
public class SedanFactory implements CarFactory {
    @Override
    public Engine createEngine() {
    	return new Engine();
    }

    @Override
    public Tire createEngine() {
    	return new Tire();
    }
}

public class SUVFactory implemnets CarFactory {
    @Override
    public Engine createEngine() {
    	return new Engine();
    }

    @Override
    public Tire createEngine() {
    	return new Tire();
    }
}


// 클라이언트 코드
public class Client {
    private CarFactory carFactory;

    public Client(CarFactory carFactory) {
        this.carFactory = carFactory;
    }

    public void assembleCar() {
        Engine engine = carFactory.createEngine();
        Tire tire = carFactory.createTire();
        CarPart carPart = carFactory.createCarPart();

        System.out.println("Assembling the car");
    }

    public static void main(String[] args) {
        // 세단 자동차 조립
        CarFactory sedanFactory = new SedanFactory();
        Client sedanClient = new Client(sedanFactory);
        sedanClient.assembleCar();

        // SUV 자동차 조립
        CarFactory suvFactory = new SUVFactory();
        Client suvClient = new Client(suvFactory);
        suvClient.assembleCar();
    }
}
CarFactory 인터페이스는 createEngine()과 createTire() 메소드를 가지고 있어 각각 엔진과 타이어 객체를 생성하고, SedanFactory와 SUVFactory는 CarFactory의 인터페이스를 구현하여 각각 세단과 SUV에 필요한 엔진과 타이어를 생성함. 이때 클라이언트는 구체적인 클래스를 알 필요 없이 CarFactory 인터페이스를 통해 공정별로 필요한 부품들을 생성할 수 있게 됨
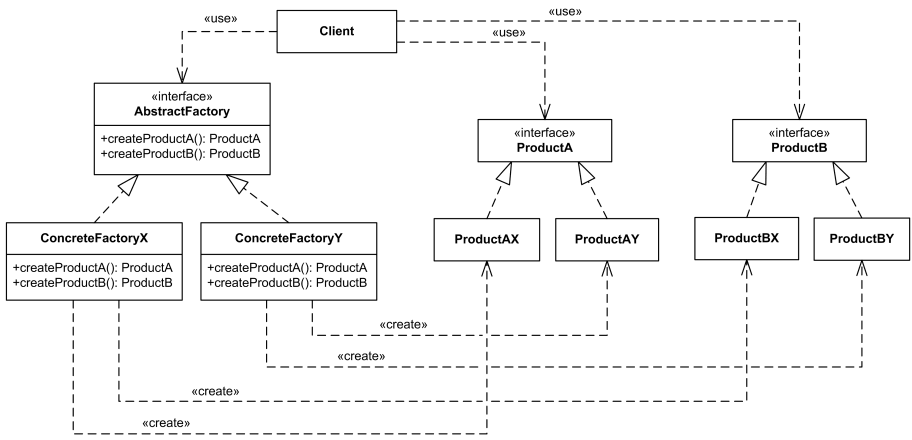
Builder Pattern
복합 객체의 생성과 표현을 분리해 동일한 생성 절차에서 다양한 표현을 가능하게 해주는 패턴으로, 생성할 객체에 넘겨줘야 할 optional 한 값이 많을 경우 유용
+ 객체 클래스 내부에 여러 개의 생성자 만들 필요 없음 (점층적 생성자 패턴*의 단점 보완)
+ 객체 생성 후 속성 변경이 가능하기에 불변 객체를 생성하거나 일부 속성만 설정하기 용이 (자바빈즈 패턴*의 단점 보완)
- 객체를 생성하기 위해 빌더 객체를 우선 생성해야 하고, 다른 패턴보다 코드가 많이 요구되기에 넘겨줄 값이 충분히 많을 때 이용하는 것이 좋음 (>> but, lambok library의 @Builder 어노테이션*으로 극복 가능)
구현
- 클래스명 관례 : 생성하고자 하는 클래스명에 Builder 붙임 (ex. PersonBuilder)
- 빌더 클래스 생성자는 public으로 하며, 필수 값은 생성자의 파라미터로 받음
- 옵션값은 각 속성마다 메소드로 제공하며, 이 때 메소드 리턴값은 빌더 객체 자신
- 생성 대상이 되는 클래스 생성자는 private으로, 빌더 클래스 내에는 build() 메소드 정의하여 bulid()를 통해서만 클라이언트에게 최종 결과물 제공
#생성

public class CoffeeBuilder {
	//변경 불가하도록 final 선언
    private final String name;       //필수
    private final int price;         //필수
    private final String taste;      //선택

	//setting static value
    public static class Builder {
        private final String name;   //필수
        private final int price;     //필수
        private String taste  = "";  //선택

        //필수값 강제
        public Builder name(String name, int price) {
        this.name = name;
        this.price = price;
        }

        //빌더 자신을 반환하도록 하여 method chaining support
        public Builder taste(String taste) {
        this.taste = taste;
        return this;
        }

        public CoffeeBuilder build() {
        	return new CoffeeBulder(this)
        }
    }

	public CoffeeBuider(Builder builder) {
    	this.name = builder.name;
        this.price = builder.price;
        this.taste = builder.taste;
    }


    @Override
    public String toString() {
    	return "name:" + name + " " + "price:" + price + " " + "taste:" + taste;
    }
}


#호출

CoffeeBuilder coffee2 = new CoffeeBuilder.Builder("americano", 4300)
                            .taste("original")
                            .build();
이렇게 하면 필수값인 name, price 속성은 생성자로 받고 옵션값인 taste는 메소드를 통해 선택적으로 받을 수 있음
여기서 체인방식으로 값 넘겨줄 수 있는 이유는 static class 안에서 자기 자신을 리턴하기 때문이며, 마지막에 build()를 호출하면 세팅해 놓은 static class Builder를 본 객체 new CoffeeBuilder의 인자로 넘겨주면서 객체 생성하게 됨
* lombok @Builder로 구현
import lombok.Builder;

@Builder(builderMethodname = "innerBuilder")
public class CoffeeBuilder {
	//
    private final String name;                     //필수
    private final int price;                       //필수
    @Builder.Default private String taste = "";     //선택

    public static CoffeeBuilder Builder(String name, int price) {
    	return innnerBuilder().name(name).price(price);
    }
}


//호출
CoffeeBuilder coffee2 = CoffeeBuilder.Builder("americano", 4300).taste("original").build();
* 점층적 생성자 패턴
인자 개수만큼 생성자 만드는 방식 (ex. 인자 a, b, c 있을 경우 new Instance(a), new Instance(a, b), new Instance(a, b, c).. 등 인자 들어갈 수 있는 조합만큼 생성자 만들고 필요에 따라 호출함)
public class Coffee {
	//
    private final String name;
    private final int price;
    private final String taste;

    public Coffee(String name, int price) {
    	this.name = name;
        this.price = price;
    }

    public Coffee(String name, int price, String taste) {
    	this.name = name;
        this.price = price;
        this.taste = taste;
    }

    ... //모든 경우의 수 만큼 생성자 생성


    @Override
    public String toString() {
    	return "name:" + name + " " + "price:" + price + " " + "taste:" + taste;
    }

}
* 자바빈즈 패턴
점층적 생성자 패턴의 단점 보완한 패턴으로 클래스 내부에 생성자 만들지 않으며, setter & getter 가 있음
단, setter를 통해 값을 계속 세팅해주어야 하고 이렇게 setter를 호출하면 내부 값이 계속 변경되기에 변경 불가능(immutable) 한 클래스 만들 수 없음
#생성

public calss CoffeeJavaBean {
    private String name;
    private int price;
    private String taste;

    public CoffeeJavaBean() {}

    public string getName() {
    	return name;
    }
    public void setName(String name)  {
    	this.name = name;
    }
    public int getPrice() {
    	return price;
    }
    public void setPrice(int price)  {
    	this.price = price;
    }
    public String getTaste() {
    	return taste;
    }
    public void setTaste(String taste) {
    	this.taste = taste;
    }

    @Override
    public String toString() {
    	return "name:" + name + " " + "price:" + price + " " + "taste:" + taste;
    }

}


# 호출

CoffeeJavaBean coffee2 = new CoffeeJavaBean();
coffee2.setName("americano");
coffee2.setPrice(4300);
coffee2.setTaste("original");
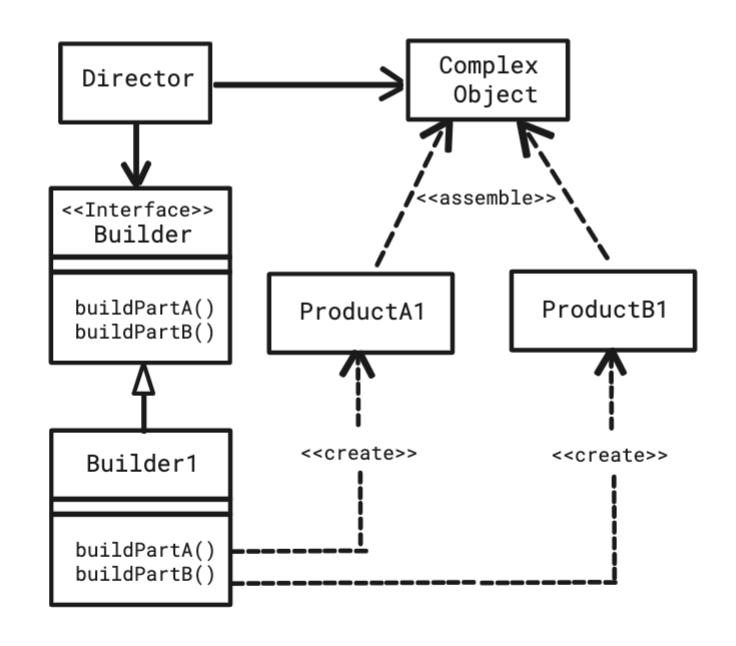
Prototype Pattern
원본 객체를 복제해 두고(프로토타입 인스턴스) 필요에 따라 이를 복제하여 객체 생성하는 패턴으로, 새로운 객체 생성에 비용이 많이 들지만 이미 유사한 객체가 존재하는 경우, 클래스의 동적로딩이 필요한 경우 유용 (ex. 게임 오브젝트 생성, DB조회 or 파일 입출력, UI Framework design element copy 등)
+ 매번 새로운 인스턴스 만드는 것보다 기존객체 복제하는 것이 비용면에서 효율적
+ 복잡한 객체 만드는 과정을 캡슐화 가능
+ 서브클래스의 수를 줄일 수 있음
- 각 ConcretePrototype 클래스들이 모두 각자의 clone() 메소드 구현해야 함
- 순환 참조가 있는 클래스 복제하기 까다로움
구현
- Prototype interface는 clone 메서드를 추상화하고, 클래스는 이를 구현함으로써 복제된 인스턴스를 제공하는 원리
- Prototype : 새로운 인스턴스를 만들기 위한 메소드 결정하는 인터페이스
- ConcretePrototype : 인스턴스를 복제하여 새로운 인스턴스 만드는 메소드 실제 구현
- Client : 인스턴스 복제 메소드를 사용해서 새로운 인스턴스 생성
// Prototype Interface
public interface UIElementPrototye {
	UIElementPrototye clone();
    void render();
}


//Concrete implementation
public class Button implements UIElementPrototye {
	private String text;
    private int width;
    private int height;

    public Button(String text, int width, int height) {
    	this.text = text;
        this.width = width;
        this.height = height;
    }

    //clone method implementation
    @Override
    public UIElementPrototye clone() {
    	return new Button(text, width, height);
    }

    // rendering method
    @Override
    public void render() {
        System.out.println("Rendering a button with text \"" + text + "\", width: " + width + ", height: " + height);    }
}

//Client class
public class UIElementPrototye {
	public static void main(String[] args) {
    	Button prototypeButton = new Button("Click", "100, 50);
       prototypeButton.render();   // Rendering a button with text "Click", width: 100, height: 50

	//버튼의 프로토타입 복제하여 새로운 버튼 생성
    UIElementPrototye cloneButton = prototypeButton.clone();
    cloneButton.render();  //  Rendering a button with text "Click", width: 100, height: 50
	}

}
이는 UI 요소를 생성하는 Button class를 프로토타입으로 구현한 것으로, 클라이언트는 먼저 Button class의 인스턴스를 생성해 둔 뒤 이를 프로토 타입으로 사용하게 됨. 즉 버튼이 필요할 때마다 Button class에 매번 접근하지 않고 프로토 타입을 복제하여 새로운 Button 인스턴스를 생성하게 되어 메모리 사용량을 줄일 수 있게 되는 것
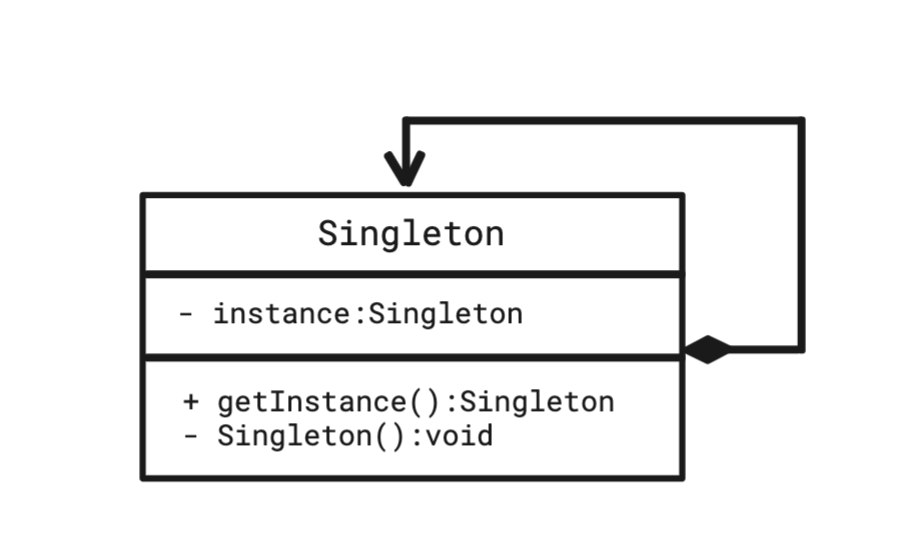
Singleton Pattern
객체의 인스턴스가 오직 1개인 패턴으로, 인스턴스가 반드시 하나여야 하지만 여러 곳에서 공유/호출되는 경우 사용
+ 최초 생성되는 인스턴스만을 고정 메모리 영역 할당하기에 메모리 낭비 방지
+ 두 번째 호출부터는 객체 로딩 시간 줄어들어 성능 향상
+ 인스턴스가 전역이기에 다른 클래스의 인스턴스들이 데이터 공유하기 쉬움
- 싱글톤인스턴스가 너무 많은 일을 하거나 데이터 공유시킬 경우 다른 클래스 인스턴스 간 결합 높아짐 (객체지향 원칙 위배)
- multi-thread 환경에서 동기화(sync) 처리하지 않을 시 인스턴스 1개 이상 생성될 수 있음 (싱글톤이 아니게 됨)
구현
- private 생성자만을 정의해 외부 클래스로부터 인스턴스 생성 차단
- 싱글톤 구현할 클래스 내부에 멤버 변수로써 private static 객체변수 만들어 인스턴스에 대한 직접 접근 차단
- public static method 통하여 싱글톤 인스턴스에 대한 외부 접점 제공
[1] Lazy Initialization
초기화를 나중에 하여 메모리 낭비를 막는 방법, getInstance()가 호출될 때 기존에 생성된 싱글톤 인스턴스가 없다면 생성
public class Singleton {
	//static 으로 singleton 객체의 인스턴스 선언
	private static Singleton instance;

    //private 으로 외부 호출 방지
    private Singleton(){}

    public static Singleton getInstance() {
    	if (instance == null) {
        	instance = new Singleton();
        }
        return instance
    }

}
+ 사용하지 않았을 경우 인스턴스 낭비되는 문제 해결
- multi-thread 환경에서 동기화 문제 발생할 수 있어 single-thread 환경이 보장되어야 함
[2] Thread Safe Singleton
getInstance에 synchronized를 걸어 싱글톤을 보장해 주는 방법
public class Singleton {
	private static Singleton instance;

    private Singleton(){}

    public static synchronized Singleton getInstance(){
    	if(instance == null){
        	instance = new Singleton();
        }
        return instance;
    }
}
+ getInstance method 내에 진입하는 thread 가 하나로 보장받음
- synchronized keyword 자체에 대한 비용 큼 (호출 잦을 시 성능 저하) >> 대응 : DCL* 방식
* DCL(Double Checked Locking)
getInstance() method 수준에 lock 걸지 않고 instance 가 null 일 때만 synchronized 동작하도록 함
public class Singleton {
	private static Singleton instance;

    private Singleton(){}

    public static Singleton getInstance(){
    	if (instance == null){
            synchronized (Singleton.class) {
            if (instance == null){
            	instance = new Singleton();
            }
        }
    }
    return instance;
}
* if 문이 두 번 나타나는 이유와 DCL 이 갖는 문제점 (정리 잘 된 글)
[1] https://gampol.tistory.com/entry/Double-checked-locking%EA%B3%BC-Singleton-%ED%8C%A8%ED%84%B4
[2] https://velog.io/@dailyzett/singleton
[3] Bill Pugh Singleton Implementation
Bill Pugh 가 고안한 inner static helper class 사용하는 방식으로, 현재 가장 널리 쓰이는 구현 방법 중 하나
private inner static class를 두어 싱글톤 인스턴스 생성. 이때, SingletonHelper class는 싱글톤 클래스가 로드될 때가 아닌, getInstance() 호출 시 메모리에 로드되며 인스턴스 생성
pulic class Singleton {
	private Singleton(){}

    private static class SingletonHelper{
    	private static final Singleton INSTANCE = new Singleton();
    }

    public static Singleton getInstance(){
    	return SingnletonHelper.INSTANCE;
    }
}
+ Thread Safe Singleton 방식의 경우 synchronized 키워드 자체에 대한 비용이 커서 싱글톤 인스턴스 호출이 잦은 경우 오버헤드가 발생할 수 있으나, 이 방법은 sync keyword사용하지 않기에 싱글톤을 보장하면서 동기화에 따른 오버헤드 없음
- Refelction* 공격에 취약
* Refleciton
런타임 시점에 클래스 정보검사, 인스턴스 생성, 메소드 호출 등을 가능하게 하여 private 멤버에 접근하거나 클래스 생성자를 우회적으로 호출 가능 >> singleton 보장 x
대응
private 선언만으로는 reflection을 사용한 객체 생성 막을 수 없기에, 예외처리하거나 이미 생성된 객체가 있다면 해당 객체 반환하도록 해야 함
//프로그램 재 실행 시 singleton 객체 초기화
private static boolean initialized = false;

private Singleton() {
	//객체 이미 존재 > 예외 발생 시킴
    if (initialized == true) {
    	throw new IllegalStateException("Singleton 객체가 이미 생성되었습니다.")
    }
    initialized = true;
}
[4] Enum Singleton (권장)
enum 방식은 내부적으로 Singleton을 보장하기에 아주 간단히 싱글톤을 구현하면서 Thread-safety를 보장 & Reflection을 통한 공격에도 안전함
public enum Singleton {
	INSTANCE;

    // Singleton 클래스의 메소드
    public void doSomething(){

    // do something
    }
}
다만, 자바에서는 열거형 상수의 순서보장, 중복정의 방지 등을 위하여 enum 클래스를 상속할 수 없도록 설계되어 있기에, 생성하려는 Singleton 인스턴스가 enum 외의 클래스를 상속해야 할 경우 사용할 수 없음
출처
- Abstract Factory -
https://bamdule.tistory.com/161
[Design Pattern] 추상 팩토리 패턴(Abstract factory pattern)
팩토리 메소드 패턴 객체의 생성을 팩토리 클래스로 위임하여 객체를 생성하는 패턴 추상 팩토리 패턴 팩토리를 추상화해서 관련있는 객체의 집합을 생성할 수 있는 팩토리를 만들고 조건에 따
bamdule.tistory.com
[디자인 패턴] 추상 팩토리 패턴 (Abstract Factory Pattern)
지난 포스팅에서 디자인패턴에 대한 개관을 살펴보았다. 이번 포스팅부터는 디자인 패턴을 하나씩 자세하게 알아보려고 한다. 가장 먼저 살펴볼 패턴은 추상 팩토리 패턴이다. 추상 팩토리 패
devowen.com
- Factory Method -
https://johngrib.github.io/wiki/pattern/factory-method/
팩토리 메소드 패턴 (Factory Method Pattern)
객체를 생성하기 위한 인터페이스를 정의하고, 인스턴스 생성은 서브클래스가 결정하게 한다
johngrib.github.io
https://dev-youngjun.tistory.com/195
팩토리 메소드 패턴(Factory Method Pattern)
1. 팩토리 메소드 패턴이란? 다양한 구현체 (Product)가 있고, 그 중에서 특정한 구현체를 만들 수 있는 다양한 팩토리(Creator)를 제공할 수 있다. 1-1. 정의(Definition) 1-1-1. 팩토리 패턴? 객체의 생성을
dev-youngjun.tistory.com
- Builder -
https://velog.io/@cieroyou/Builder-%EC%82%AC%EC%9A%A9%EB%B2%95
@Builder class 선언 vs constructor 선언
선택적 매개변수가 많을 때매개변수가 많고 게다가 선택적 매개변수가 많을 때 constructor 를 사용하려면 선택적매개변수가 각기 다른 생성자를 만들어줘야하는데, 매개변수가 많은 경우에는 정
velog.io
https://roadofdevelopment.tistory.com/34
[디자인패턴]빌더 패턴(Builder Pattern)
-객체를 생성하는 패턴 중 하나인 빌더 패턴(Builder Pattern)을 알아본다. -빌더 패턴 이전에 객체를 생성하는 가장 일반적인 패턴인 점층적 생성자 패턴, 자바빈 패턴을 먼저 알아본다. -이번 포스
roadofdevelopment.tistory.com
https://dreamcoding.tistory.com/56
[디자인 패턴] 빌더 패턴(Builder Pattern)
스프링 인 액션 5판 스터디를 진행하던 중에 스프링 시큐리티에서 빌더 패턴이 사용되는 부분을 보고 빌더 패턴에 대한 포스팅을 해보겠습니다. 빌더 패턴은 소프트 웨어 디자인 패턴 중에 하나
dreamcoding.tistory.com
https://readystory.tistory.com/121
[생성 패턴] 빌더 패턴(Builder pattern) 이해 및 예제
빌더 패턴은 복잡한 객체를 생성하는 방법을 정의하는 클래스와 표현하는 방법을 정의하는 클래스를 별도로 분리하여, 서로 다른 표현이라도 이를 생성할 수 있는 동일한 절차를 제공하는 패턴
readystory.tistory.com
- Prototype -
[디자인패턴] 프로토타입패턴(Prototype Pattern)
프로토타입은 실제 제품을 만들기에 앞서 테스트를 위한 샘플 제품을 만드는데 이때, 샘플 제품을 프로토타입이라고 칭한다.프로토타입패턴은 객체를 생성하는데 비용이 많이 들고, 비슷한 객
velog.io
https://readystory.tistory.com/122
[생성 패턴] 프로토타입 패턴(Prototype Pattern) 이해 및 예제
프로토타입은 주로 실제 제품을 만들기에 앞서 대략적인 샘플 정도의 의미로 사용되는 단어입니다. 프로토타입 패턴은 객체를 생성하는 데 비용(시간과 자원)이 많이 들고, 비슷한 객체가 이미
readystory.tistory.com
- Singleton -
싱글톤 구현 케이스 별 상세히 정리 : https://readystory.tistory.com/116
[생성 패턴] 싱글톤(Singleton) 패턴을 구현하는 6가지 방법
첫 번째로 소개할 디자인 패턴은 싱글톤(Singleton) 패턴입니다. 종종 싱글톤 패턴을 '단일체' 패턴으로 번역하고 있는 책도 있지만, 일반적으로 싱글톤 패턴이라고 부릅니다. 싱글톤 패턴은 객체
readystory.tistory.com
https://gyoogle.dev/blog/design-pattern/Singleton%20Pattern.html
싱글톤 패턴(Singleton pattern) | 👨🏻💻 Tech Interview
싱글톤 패턴(Singleton pattern) 애플리케이션이 시작될 때, 어떤 클래스가 최초 한 번만 메모리를 할당(static)하고 해당 메모리에 인스턴스를 만들어 사용하는 패턴 즉, 싱글톤 패턴은 '하나'의 인스
gyoogle.dev
싱글톤(Singleton) 패턴이란?
싱글톤 패턴은 객체의 인스턴스를 한개만 생성되게 하는 패턴입니다.
velog.io
https://velog.io/@dailyzett/singleton
싱글톤 디자인 패턴을 파헤쳐보자
WELCOME TO SINGLETON
velog.io
'소프트웨어공학' 카테고리의 다른 글
| 10 | 디자인 패턴 (요약) (2) | 2023.05.06 |
|---|---|
| 09 | UX UI 디자인 (feat. @Madia designer) (0) | 2023.04.30 |
| 08 | 소프트웨어 아키텍처 (0) | 2023.04.30 |
| 07 | 설계 원리와 구조적 설계 (0) | 2023.04.28 |
| 06 | Sequence Diagram, State Diagram (0) | 2023.04.26 |


